High Protein Quark Tnon-alcoholic aler – a phrase that might sound unfamiliar to some, but I promise it’s about to become a cherished staple in your healthy recipe repertoire!
Imagine sinking your teeth into a perfectly golden, pillowy-soft delight that’s bursting with flavor, incredibly satisfying, and remarkably good for you. This isn’t just another sweet treat; it’s a culinary cleverness that combines the rich, creamy goodness of quark with the delightful simplicity of a light pancake or fritter. For centuries, quark, a traditional European fresh dairy product, has been a foundational ingredient in countless dishes, particularly in German and Eastern European cuisines, celebrated for its naturally high protein content and versatile texture.
This recipe harnesses that nutritional powerhouse, transforming it into something truly special. People adore this dish for its exquisite balance of a subtle tang from the quark, a delicate sweetness, and a wonderfully soft, almost custardy texture that truly melts in your mouth. It’s an ideal choice for anyone looking to increase their protein intake without sacrificing taste, making it perfect for fitness enthusiasts, busy parents, or simply those craving a wholesome yet indulgent treat.
A Deliciously Healthy Choice for Any Time of Day
Whether you’re seeking a quick, energizing breakfast, a fulfilling post-workout snack, or a wholesome dessert for the whole family, this non-alcoholic version offers unparalleled convenience without compromising on taste or health benefits. I am incredibly excited to guide you through creating your very own delectable High Protein Quark Tnon-alcoholic aler, a dish that proves healthy eating can be utterly delicious and effortlessly enjoyable.

Ingredients:
- For the High Protein Quark Cream Base:
- 750g (approximately 3 cups) Plain Quark: I personally love using a low-fat or fat-free quark for this recipe, as it keeps the overall calorie count down while delivering an incredible amount of protein. However, if you prefer a richer, creamier texture, a full-fat quark will also work beautifully. Just ensure it’s plain and unsweetened.
- 250g (approximately 1 cup) Plain Greek Yogurt: I opt for 0% or 2% fat Greek yogurt. This adds an extra layer of creamy richness and a subtle tang that complements the quark perfectly. It also significantly boosts the protein content, which is exactly what we’re aiming for with this “High Protein Quark Dessert”.
- Sweetener, to taste: I typically use a granular erythritol-stevia blend, equivalent to about 150g (approximately 3/4 cup) of regular sugar. The beauty of using sugar substitutes is the flexibility; you can adjust the sweetness level precisely to your liking without adding extra calories or carbs. Feel free to use your preferred sugar alternative, whether it’s monk fruit, xylitol, or a small amount of honey or maple syrup if you’re not strictly avoiding sugars.
- 2 teaspoons Pure Vanilla Extract: This is a non-negotiable for me! A good quality vanilla extract provides warmth and depth to the cream, enhancing all the other flavors. Don’t skimp on this; it makes a big difference.
- 1 tablespoon Fresh Lemon Zest: From about 1 medium-sized lemon. The vibrant zest provides a wonderful, subtle citrus lift that cuts through the richness of the dairy, making the dessert feel incredibly fresh and bright.
- 1/2 teaspoon Xanthan Gum or Cornstarch (optional, for thickening): If you prefer a firmer, more stable cream, especially if your quark is particularly moist, a small amount of xanthan gum or cornstarch can be added. I find it helps achieve a lovely, pudding-like consistency. If using cornstarch, ensure it’s mixed with a tiny bit of liquid first to prevent lumps.
- 30g (1 scoop) Vanilla or Unflavored Protein Powder: This is our secret weapon for maximizing the “High Protein” aspect! A good quality whey or casein protein powder blends seamlessly into the quark mixture. Vanilla protein powder will amplify the existing vanilla notes, but an unflavored one will also work if you prefer to keep the flavor profile simple.
- For the Coffee Infusion & Layering Elements:
- 350ml (approximately 1.5 cups) Strong Brewed Coffee: The backbone of our layering! I always recommend using freshly brewed, strong coffee. Whether you prefer a dark roast, espresso, or a robust filter coffee, ensure it has a good, bold flavor. It is crucial that the coffee is cooled completely before use, otherwise, it will make our ladyfingers soggy too quickly and potentially thin out the cream.
- Optional: 1 tablespoon Non-Alcoholic Coffee Syrup (e.g., vanilla, hazelnut, or caramel) or an additional teaspoon of vanilla extract: To enhance the coffee flavor and add an extra layer of aroma without any alcohol. This is a personal preference; I sometimes add a dash of vanilla syrup for a little extra sweetness and depth.
- 200g (approximately 24-30 pieces, depending on size) Ladyfingers (Savoiardi Biscuits): These light, airy, and absorbent biscuits are perfect for soaking up the coffee. They provide the classic texture we’re after. Look for dry, firm ones.
- Alternative Layering Base (for a different texture or higher fiber): You could also use toasted oat biscuits, whole-wheat graham crackers, or even slices of a high-protein pound cake. Adjust the dipping time accordingly, as their absorption rates will differ from ladyfingers.
- For the Topping & Garnish:
- 2 tablespoons Unsweetened Cocoa Powder: A dusting of good quality, unsweetened cocoa powder is essential for that classic finish and a touch of delightful bitterness that contrasts beautifully with the sweet cream.
- Optional: Fresh Berries (e.g., raspberries, blueberries) or a few shavings of Sugar-Free Dark Chocolate: For an extra burst of freshness, color, and texture, I sometimes add a few fresh berries just before serving. A sprinkle of dark chocolate shavings can also elevate the presentation and flavor.
Preparation Phase 1: The Coffee Infusion – Brewing and Cooling
- Brew Your Strong Coffee: My first step, and a crucial one, is to prepare the coffee. I usually brew about 1.5 to 2 cups of my favorite strong coffee – a dark roast espresso or a robust French press blend works wonderfully here. The strength of the coffee is important because it needs to impart a distinct flavor to the dessert, which will mellow out when combined with the sweet cream. Aim for a coffee that you would genuinely enjoy drinking on its own, as its quality will shine through in the final dish.
- Ensure Complete Cooling: Once brewed, I immediately pour the hot coffee into a shallow dish or bowl to help it cool down as quickly as possible. This step is absolutely critical. If you try to dip the ladyfingers in warm or hot coffee, they will instantly become mushy and fall apart, ruining the structure of your dessert. I sometimes even pop the bowl into the refrigerator or freezer for 15-20 minutes, stirring occasionally, to speed up the cooling process. We need it to be at room temperature, or even slightly chilled, before moving on.
- Optional Flavor Enhancement: While the coffee is cooling, this is the perfect time to stir in any optional flavorings. If I want a little extra complexity or sweetness in the coffee layer, I’ll add a tablespoon of a non-alcoholic coffee syrup, like vanilla, hazelnut, or caramel. Alternatively, an extra teaspoon of pure vanilla extract can also deepen the aroma and flavor profile of the coffee. Give it a good stir to ensure it’s fully incorporated.
Preparation Phase 2: Crafting the High Protein Quark Cream
- Combine the Dairy Bases: In a large mixing bowl, I start by adding the 750g of plain quark and the 250g of plain Greek yogurt. It’s important to scrape the containers thoroughly to get every last bit of that creamy goodness. These two form the foundational texture and protein source of our dessert, and combining them first helps ensure a uniform base.
- Whip to Smoothness: Using an electric hand mixer on a medium-low speed, or a sturdy whisk and a good arm workout, I beat the quark and Greek yogurt together until the mixture is completely smooth and free of any lumps. Quark can sometimes be a bit firm, so a thorough whipping ensures a silky, luxurious texture for our cream. This usually takes about 2-3 minutes. You want it to be light and airy, not dense.
- Introduce the Sweetness: Now, I gradually add my chosen granular sweetener (equivalent to about 150g of sugar). I always start with a little less than the full amount, giving it a good mix, and then taste-test. This is your chance to really personalize the dessert! Some people prefer it sweeter, others less so. Continue adding and mixing until you reach your ideal level of sweetness. Remember that the coffee layer will add a touch of bitterness, so the cream needs to be pleasantly sweet to balance it out.
- Infuse with Vanilla and Lemon Zest: Next, I stir in the 2 teaspoons of pure vanilla extract. The rich, aromatic vanilla is essential here. Immediately following, I add the tablespoon of fresh lemon zest. The lemon zest isn’t meant to make the dessert taste lemony; rather, it’s there to provide a bright, fragrant counterpoint that elevates all the other flavors, preventing the cream from tasting heavy or one-dimensional. Mix these in thoroughly until their aromas are beautifully distributed throughout the cream.
- Integrate the Protein Powder: This is where we truly boost the “High Protein” aspect! I carefully add the 30g (1 scoop) of vanilla or unflavored protein powder to the mixture. It’s best to add it gradually while mixing on a low speed to prevent it from clumping. Protein powder can sometimes make a mixture a little thicker, so keep an eye on the consistency. Ensure it’s fully incorporated, leaving no powdery residue. If you find your cream becomes too thick at this stage, you can add a tiny splash (a teaspoon at a time) of milk or even a bit more Greek yogurt to achieve your desired consistency.
- Optional Thickener for Stability: If I’m aiming for a very firm, sliceable dessert, or if my quark happens to be on the looser side, I’ll now consider adding the 1/2 teaspoon of xanthan gum or cornstarch. If using xanthan gum, sprinkle it very slowly over the surface of the cream while mixing on low to prevent clumping. For cornstarch, I’d whisk it first with a tablespoon of cold milk or water to form a slurry, then stir that into the cream. Beat for another minute or so to allow the thickener to activate and incorporate. This step truly helps in achieving that perfect, stable, pudding-like consistency that holds its shape beautifully.
- Final Consistency Check: At this point, I like to give the cream a final taste and check its consistency. It should be thick, smooth, creamy, and easily spreadable, yet firm enough to hold its shape when a spoon is lifted. It should also be perfectly balanced in sweetness and flavor – a delightful, protein-packed cloud of deliciousness ready for layering!
Preparation Phase 3: Assembling Our High Protein Quark Delight
- Choose Your Dish: I always start by selecting an appropriate serving dish. A clear glass dish (such as an 8×8 inch square baking dish, a 9×13 inch rectangular dish, or a deep trifle bowl) works best, as it allows you to admire the beautiful layers we’re about to create. The size of the dish will dictate how many layers you can make, so choose one that’s deep enough to accommodate at least two layers of ladyfingers and cream.
- Prepare the Dipping Station: Set up your cooled coffee infusion in a shallow bowl that’s wide enough to comfortably dip the ladyfingers. Have your prepared quark cream and ladyfingers ready to go right next to it. Efficiency is key here!
- The First Layer of Ladyfingers: This is a delicate but crucial step. I take one ladyfinger at a time and briefly dip each side into the cooled coffee. The key here is speed! We’re talking 1-2 seconds per side, just enough to moisten the biscuit without making it soggy. If you over-soak them, your dessert will become a watery, structural mess. The ladyfingers should still retain some of their firmness.
- Arrange the Base Layer: As soon as each ladyfinger is lightly dipped, I arrange them snugly in a single layer at the bottom of your chosen serving dish. If you need to break some to fill in gaps and create an even layer, that’s perfectly fine. We want a solid, continuous base.
- First Layer of High Protein Quark Cream: Once your first layer of coffee-soaked ladyfingers is complete, it’s time for the star of the show! I spoon approximately half of the high protein quark cream mixture evenly over the ladyfingers. Using an offset spatula or the back of a spoon, I gently spread the cream all the way to the edges, creating a smooth, even layer. Take your time to ensure it looks appealing and covers every biscuit.
- Second Layer of Ladyfingers: Repeat the dipping process for the remaining ladyfingers. Again, remember the quick dip – just moisten, don’t drench! Arrange these dipped ladyfingers directly on top of the first layer of quark cream, ensuring they are placed as evenly as possible. This creates the next structural component of our layered delight.
- Final Layer of High Protein Quark Cream: Now, I gently spoon the remaining quark cream over the second layer of ladyfingers. Spread it out carefully and evenly, covering the entire surface. I like to make the top layer as smooth and appealing as possible, perhaps even creating a few gentle swirls with the back of my spoon for visual interest. This will be the visible top layer before we add our garnish, so presentation here is a nice touch.
- A Gentle Tap: Once all the layers are assembled, I give the dish a very gentle tap on the countertop a few times. This helps to settle the layers, remove any trapped air pockets, and ensure the cream is evenly distributed throughout.
Preparation Phase 4: Chilling and Serving Our High Protein Quark Delight
-
The Crucial Chilling Period: This step is non-negotiable for success! Once assembled, I tightly cover the dish with plastic wrap, ensuring it doesn’t touch the surface of the cream if possible. Then, I carefully place it in the refrigerator to chill for a minimum of 4-6 hours, but ideally overnight. This extended chilling time is vital for several reasons:
- Flavor Development: It allows all the flavors – the bold coffee, the sweet vanilla, the tangy quark, and the bright lemon zest – to meld and harmonize beautifully. The dessert will taste significantly better after a good chill.
- Setting and Stability: The cream needs time to firm up and set properly. This ensures that when you slice into it, the layers hold their shape, giving you that beautiful, clean presentation. The ladyfingers will also fully absorb the coffee and soften to a perfect cake-like consistency.
- The Dusting of Cocoa (Timing is Key!): Just before I’m ready to serve, and I mean literally minutes before, I carefully uncover the chilled dessert. Then, using a fine-mesh sieve, I generously dust the entire top surface with unsweetened cocoa powder. Why just before serving? If you dust the cocoa too early, it will absorb moisture from the refrigerator and look patchy and wet, losing that beautiful, velvety matte finish. The fine sieve ensures an even, light coating.
- Optional Garnishes for Extra Flair: If I want to add an extra touch of elegance or freshness, this is the moment. I might scatter a handful of fresh raspberries or blueberries over the cocoa-dusted top for a pop of color and a tart counterpoint to the sweet cream. Alternatively, a few delicate shavings of sugar-free dark chocolate can add a sophisticated look and a subtle hint of chocolate richness.
- Slicing and Serving: Using a sharp knife that has been run under hot water and wiped clean (this helps get cleaner slices!), I carefully cut the “High Protein Quark Layered Delight” into individual portions. Each slice should reveal those gorgeous, distinct layers of coffee-soaked ladyfingers and creamy quark.
- Enjoy Immediately and Store Properly: Serve each delightful piece immediately. Leftovers, if there are any (which is rare in my house!), should be stored in an airtight container in the refrigerator. This dessert is best enjoyed within 3-4 days to maintain its optimal freshness and texture. It truly makes for a guilt-free, high-protein treat that satisfies your sweet tooth without compromising your nutritional goals. I hope you love making and eating this as much as I do!
Conclusion:
And there you have it! We’ve journeyed through the simple steps to create a dish that truly stands out in its category. If you’ve been searching for that elusive combination of genuinely delicious taste, incredible nutritional value, and surprisingly simple preparation, then your search, my friend, officially ends here. This recipe isn’t just another item to add to your culinary repertoire; it’s a game-changer, a staple that promises to elevate your daily routine whether you’re fueling up for a busy day, recovering after a strenuous workout, or simply craving something wholesome and satisfying. I personally consider it an absolute triumph of flavor meeting function, and I’m confident that once you try it, you’ll wholeheartedly agree.
Why This Recipe is a True Must-Try
Let me just reiterate why I am so passionately advocating for you to make this wonderful creation. First and foremost, the core ingredient, quark, brings an unparalleled creaminess and a fantastic protein punch, making this recipe an ideal choice for anyone looking to increase their protein intake without resorting to bland, uninspiring options. It’s incredibly satisfying, ensuring you feel full and energized for longer, which is fantastic for managing hunger and supporting a healthy lifestyle. Unlike many high-protein alternatives that can feel heavy or artificial, our dish maintains a delightful lightness and a natural, wholesome character. It’s truly a testament to how simple, good-for-you ingredients can come together to create something extraordinary. Furthermore, the inherent versatility means it seamlessly fits into various dietary preferences and times of day, proving itself to be far more than just a fleeting trend. This isn’t just food; it’s smart nutrition wrapped in deliciousness.
I genuinely believe that experiencing the unique texture and the comforting yet vibrant flavors of this recipe is something everyone deserves. It’s designed to be approachable for cooks of all skill levels, meaning you don’t need to be a gourmet chef to achieve perfect results. The ingredients are accessible, the method is straightforward, and the payoff is immense. You’re not just making a meal; you’re investing in your well-being, treating your taste buds, and perhaps even discovering a new favorite comfort food that you can feel good about enjoying regularly. This isn’t just about eating; it’s about savoring, nourishing, and enjoying the process from start to finish. I’ve poured my heart into perfecting this balance, and I can’t wait for you to experience it firsthand.
Elevate Your Experience: Serving Suggestions & Creative Variations
Now, while this dish is absolutely phenomenal on its own, its true beauty lies in its adaptability. I love experimenting with different toppings and mix-ins to keep things fresh and exciting. For a classic breakfast or brunch, I highly recommend serving it warm with a generous dollop of fresh berries – think plump blueberries, raspberries, or sliced strawberries – and a drizzle of pure maple syrup or a light touch of raw honey. The natural sweetness of the fruit beautifully complements the subtle tang of the quark. If you’re feeling a bit more indulgent, a sprinkle of toasted nuts like slivered almonds or chopped walnuts adds a lovely crunch and extra healthy fats. For a touch of spice, a dash of cinnamon or a pinch of cardamom can transform the flavor profile into something truly aromatic and comforting.
Thinking beyond breakfast? This recipe also makes for an incredible post-workout snack or a light, wholesome dessert. Try pairing it with a homemade fruit compote – a simple blend of simmered apples or peaches with a hint of vanilla – for a warm, comforting treat. You could also stir in some grated lemon or orange zest directly into the batter before cooking for a brighter, more citrusy note. For those who enjoy a bit of chocolate, a handful of sugar-free chocolate chips or finely chopped dark chocolate can be folded in, creating a delightful surprise in every bite. And remember, you can always adjust the sweetness level to your personal preference; a little extra sweetener or a natural option like stevia or erythritol can be used if you have a sweeter tooth. The possibilities are truly endless, and I encourage you to get creative and make this recipe truly your own.
Your Turn: Try the High Protein Quark Tnon-alcoholic aler!
So, what are you waiting for? This is your invitation, your call to action, to dive into your kitchen and experience the absolute joy of preparing and savoring this incredible creation. I am genuinely excited for you to discover just how easy and rewarding it is to make your very own High Protein Quark Tnon-alcoholic aler. I promise you, this isn’t just a recipe; it’s an experience, a journey towards healthier eating that doesn’t compromise on flavor or satisfaction. Imagine the feeling of accomplishment as you pull your first batch from the pan, the delightful aroma filling your kitchen, and that first perfect bite. It’s truly a moment to cherish.
Once you’ve had the chance to try it, I would absolutely love to hear about your experience! Did you stick to the classic version, or did you venture into some exciting variations? What were your favorite toppings or mix-ins? Please don’t hesitate to share your thoughts, your successes, and even your culinary experiments in the comments section below. Your feedback and creativity not only inspire me but also help build our wonderful community of fellow food lovers. Let’s spread the word about this fantastic recipe and inspire others to embrace delicious, wholesome eating. Happy cooking, and I can’t wait to hear all about your delicious journey!
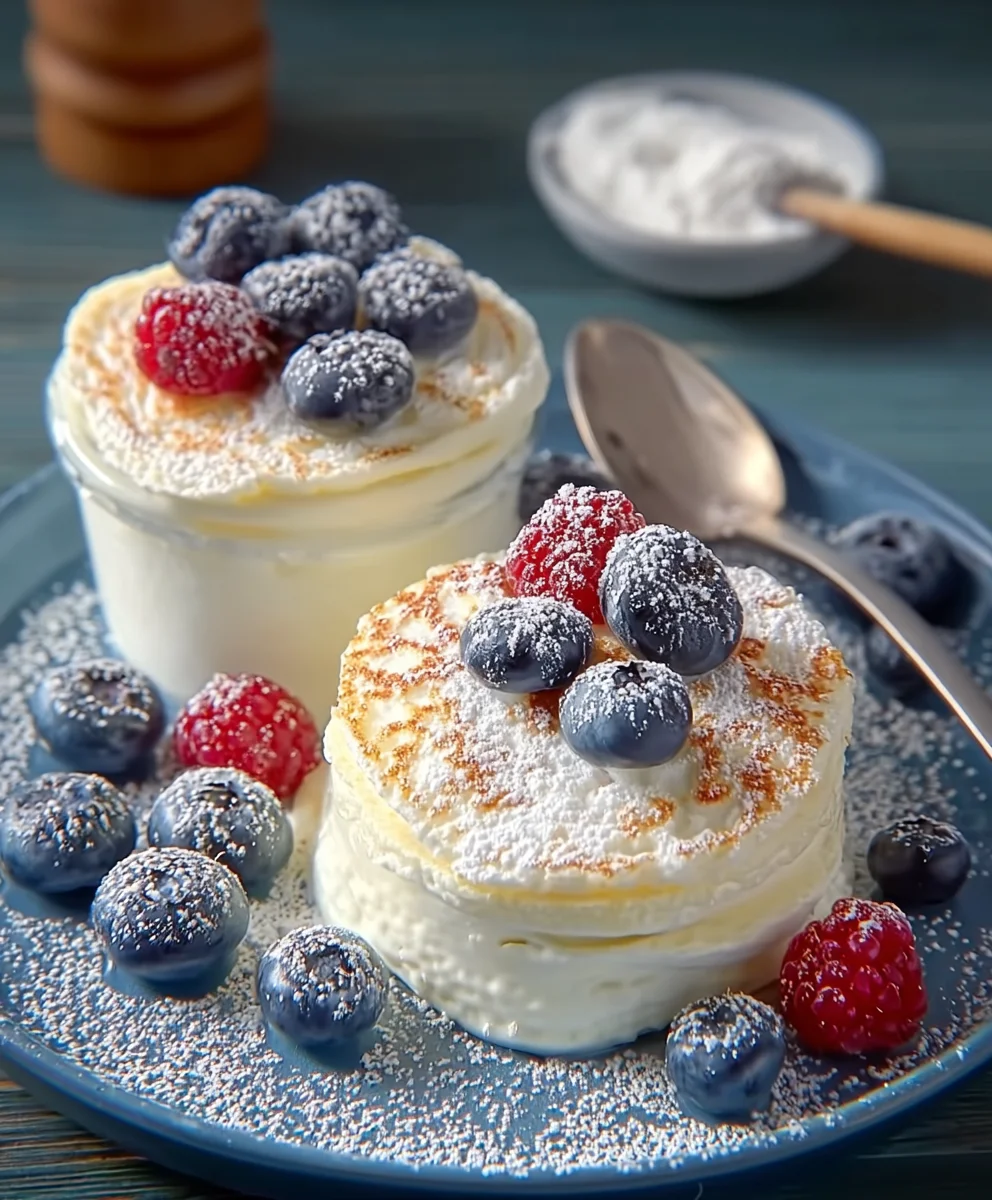
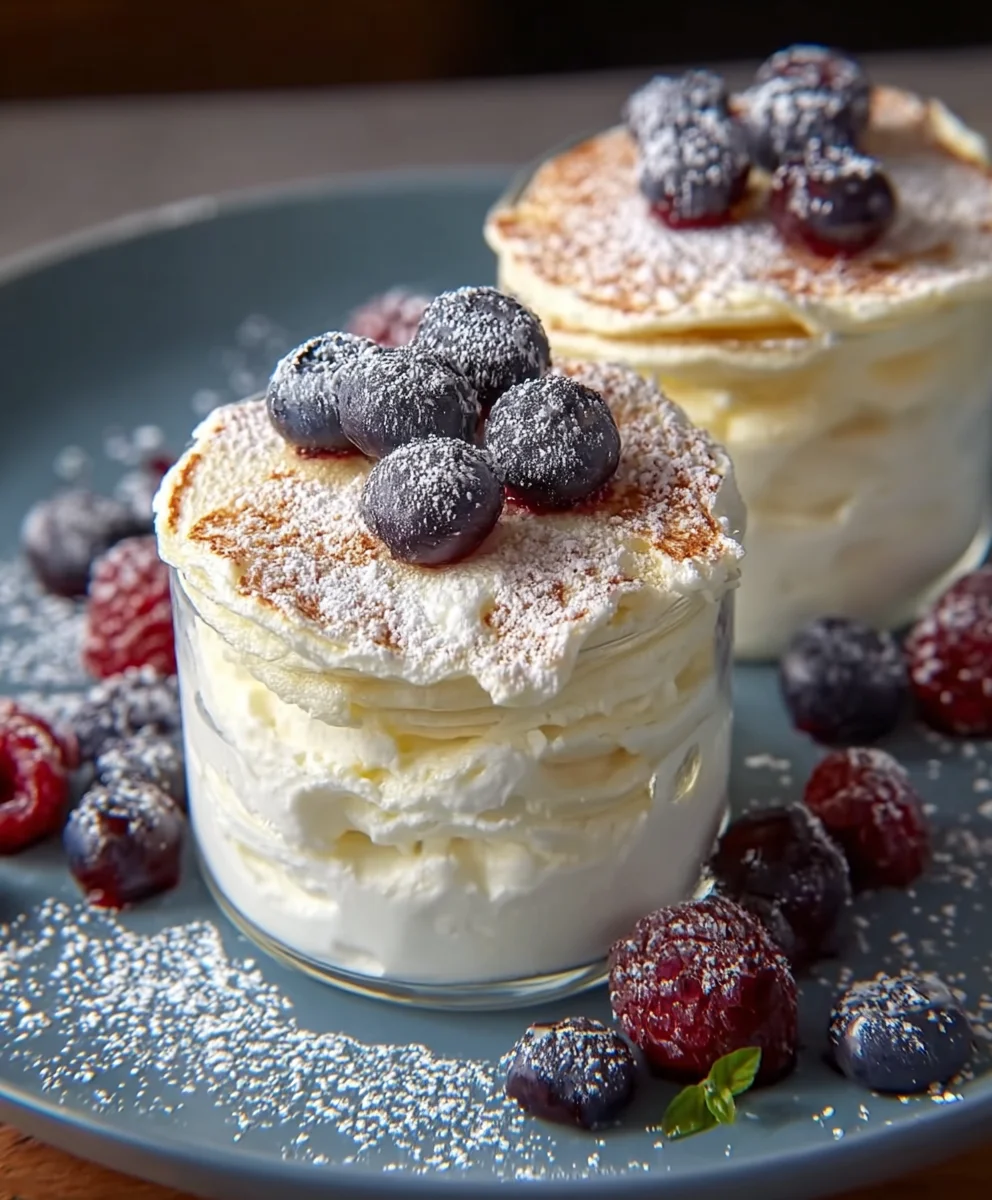
Delicious High Protein Quark Taler (Quark Fritters)
Imagine a perfectly golden, pillowy-soft delight that’s bursting with flavor. These High Protein Quark Taler (Quark Fritters) are a non-alcoholic, incredibly satisfying, and remarkably good-for-you treat, ideal for a healthy breakfast, snack, or dessert.
Ingredients
-
500 g Low-fat Quark
-
3 Eggs
-
2 tsp Baking Powder
-
90 g Flour
-
1 tsp Vanilla Extract
-
Sweetener of choice (e.g., maple syrup, sugar substitute, honey)
-
1 tbsp Oil (for frying)
-
Powdered sugar (optional, for serving)
-
Fresh berries (e.g., raspberries, blueberries, optional)
Instructions
-
Step 1
In a large bowl, thoroughly mix the low-fat quark, eggs, baking powder, flour, vanilla extract, and your chosen sweetener until a smooth, uniform batter forms. -
Step 2
Heat oil in a non-stick pan over medium heat. Drop spoonfuls of batter into the pan, gently flattening each into a small fritter. Cook for 3-4 minutes per side until golden brown and cooked through. -
Step 3
Serve the warm Quark Taler immediately. Optionally, dust with powdered sugar and garnish with fresh berries for extra flavor and presentation.
Important Information
Nutrition Facts (Per Serving)
It is important to consider this information as approximate and not to use it as definitive health advice.
Allergy Information
Please check ingredients for potential allergens and consult a health professional if in doubt.

Leave a Comment