Achieving that perfect, golden, and audibly crisp exterior on a 2 inch thick cutlet is truly a culinary delight, transforming a simple piece of meat or vegetable into an extraordinary meal. Imagine sinking your teeth through a shatteringly crunchy crust, only to be met with an incredibly juicy and tender interior. This isn’t just about frying; it’s about a methodical approach to creating textural perfection that has captivated palates worldwide for generations.
The art of the breaded cutlet, particularly when using panko breadcrumbs, holds a special place in global cuisine, famously celebrated in Japanese dishes like Tonkatsu. This technique, which meticulously involves setting up a dedicated breading station—flour, beaten eggs, and those wonderfully light panko breadcrumbs—ensures an even coating and that signature crispness. People adore this dish for its incredible contrast in textures, the rich savory flavor, and the comforting satisfaction it brings. Whether it’s a hearty pork cutlet or a flavorful chicken breast, mastering the preparation of a truly impressive 2 inch thick breaded delight is a skill that yields immensely delicious rewards, perfect for any occasion.

Ingredients:
- 4 boneless pork loin chops, about 1-inch thick each (I prefer starting with chops that are a good thickness, around 1-inch, so I have enough meat to pound out evenly without tearing. If you happen to find a whole pork loin, you could cut it into 2-inch thick portions first and then pound them, giving you a very substantial cutlet!)
- 1 teaspoon salt, plus more for seasoning
- ½ teaspoon black pepper, freshly ground, plus more for seasoning
- ½ cup all-purpose flour (for dredging)
- 2 large eggs (for the egg wash)
- 1 tablespoon milk or water (to mix with the eggs)
- 2 cups Panko breadcrumbs (the secret to ultimate crispiness!)
- 4-6 cups neutral oil for frying, such as canola, vegetable, grapeseed, or peanut oil (enough to submerge the cutlets halfway or more in your chosen pan)
- Optional: Lemon wedges, tonkatsu sauce, or your favorite dipping sauce for serving
- Optional: Fresh parsley or chives, chopped, for garnish
Preparing the Pork Cutlets
This is where we transform simple pork chops into magnificent, tender cutlets ready for their crispy journey. Taking the time here ensures even cooking and maximum deliciousness.
- Trim and Prepare the Pork: First things first, let’s get our pork chops ready. Lay each pork chop on a clean cutting board. Carefully trim away any excess fat, gristle, or silver skin. While a little fat can add flavor, too much can make the cutlets unevenly cooked or greasy.
- Butterfly (Optional, for thicker chops): If your chops are on the thicker side, say over 1.5 inches, you might want to butterfly them. To do this, hold the chop flat with one hand. With your other hand, use a sharp knife to make a horizontal cut almost all the way through the middle of the chop, opening it up like a book. This creates a larger, thinner piece that’s easier to pound evenly. For chops starting around 1 inch, this step isn’t usually necessary as they’ll pound out beautifully.
- Pound the Pork Evenly: Now for the fun part! Place one pork chop between two sheets of plastic wrap or inside a large freezer bag. This prevents the meat from tearing and keeps your work surface clean. Using a meat mallet or the flat side of a heavy pan, begin to pound the pork chop gently but firmly, working from the center outwards.
- Achieve Consistent Thickness: The goal here is to achieve a consistent thickness of about ½ to ¾ inch across the entire cutlet. A uniform thickness is crucial for even cooking; if parts are thicker, they’ll be undercooked, and if parts are too thin, they’ll dry out. Take your time, turning the cutlet as needed, and pay attention to any thicker spots that need extra attention. You’ll notice the cutlet spreading out quite a bit, becoming larger and more uniform. Repeat this process for all four pork chops.
- Season the Pork: Once all your cutlets are pounded to perfection, remove them from the plastic wrap. Season both sides generously with salt and freshly ground black pepper. Don’t be shy here; this is one of your main opportunities to build flavor directly into the meat. I often find a full teaspoon of salt and half a teaspoon of pepper, divided among the four cutlets, is just right, but adjust to your taste.
Setting Up the Breading Station
This is a critical step for achieving that signature crispy crust. A well-organized breading station makes the process smooth, efficient, and ensures every cutlet gets perfectly coated. Think of it as an assembly line!
- Prepare Your Workspace: Find a clear, spacious area on your kitchen counter. You’ll need enough room to line up three shallow bowls or dishes, plus space for your seasoned pork cutlets on one end and a clean plate or baking sheet for the breaded cutlets on the other.
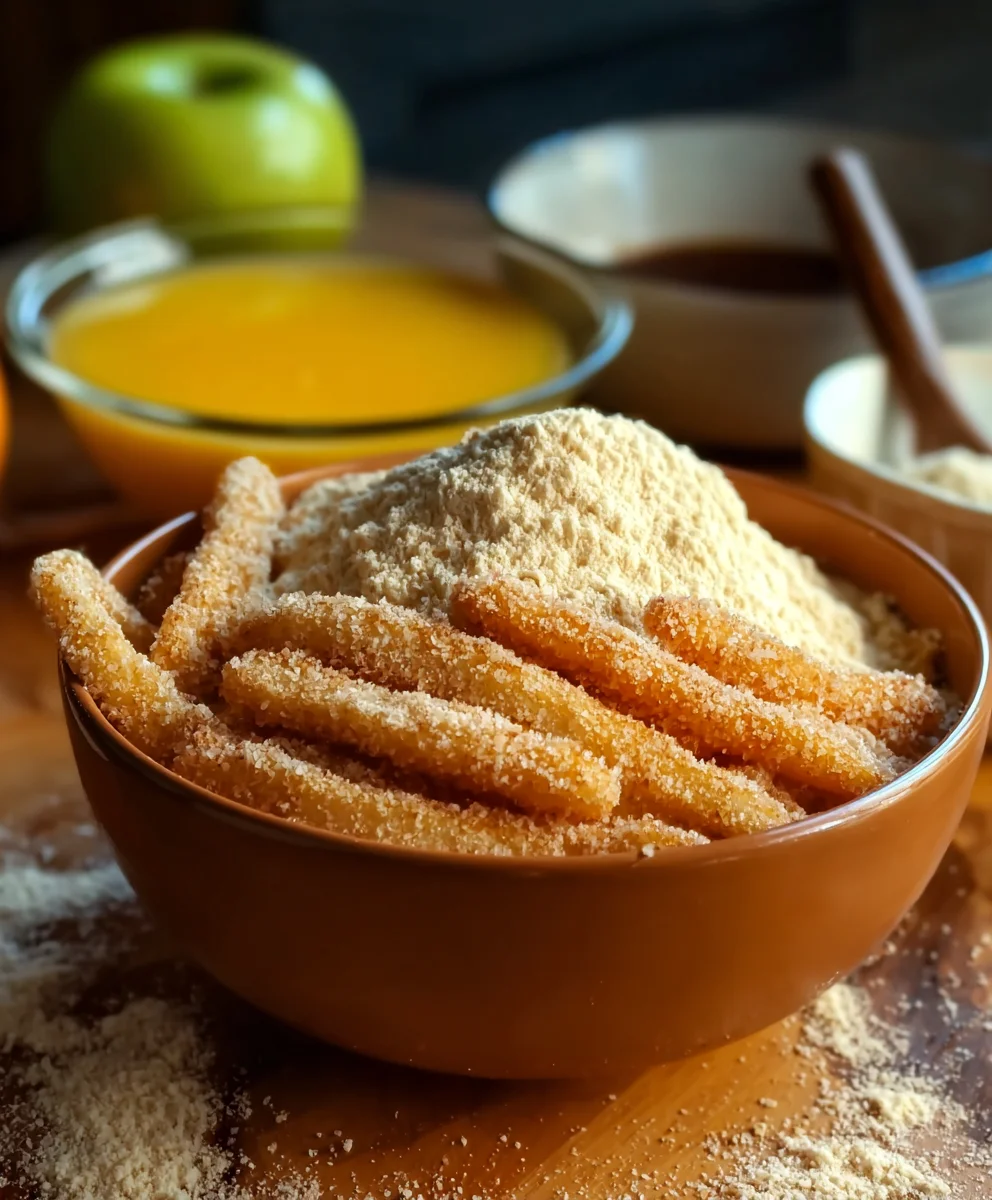
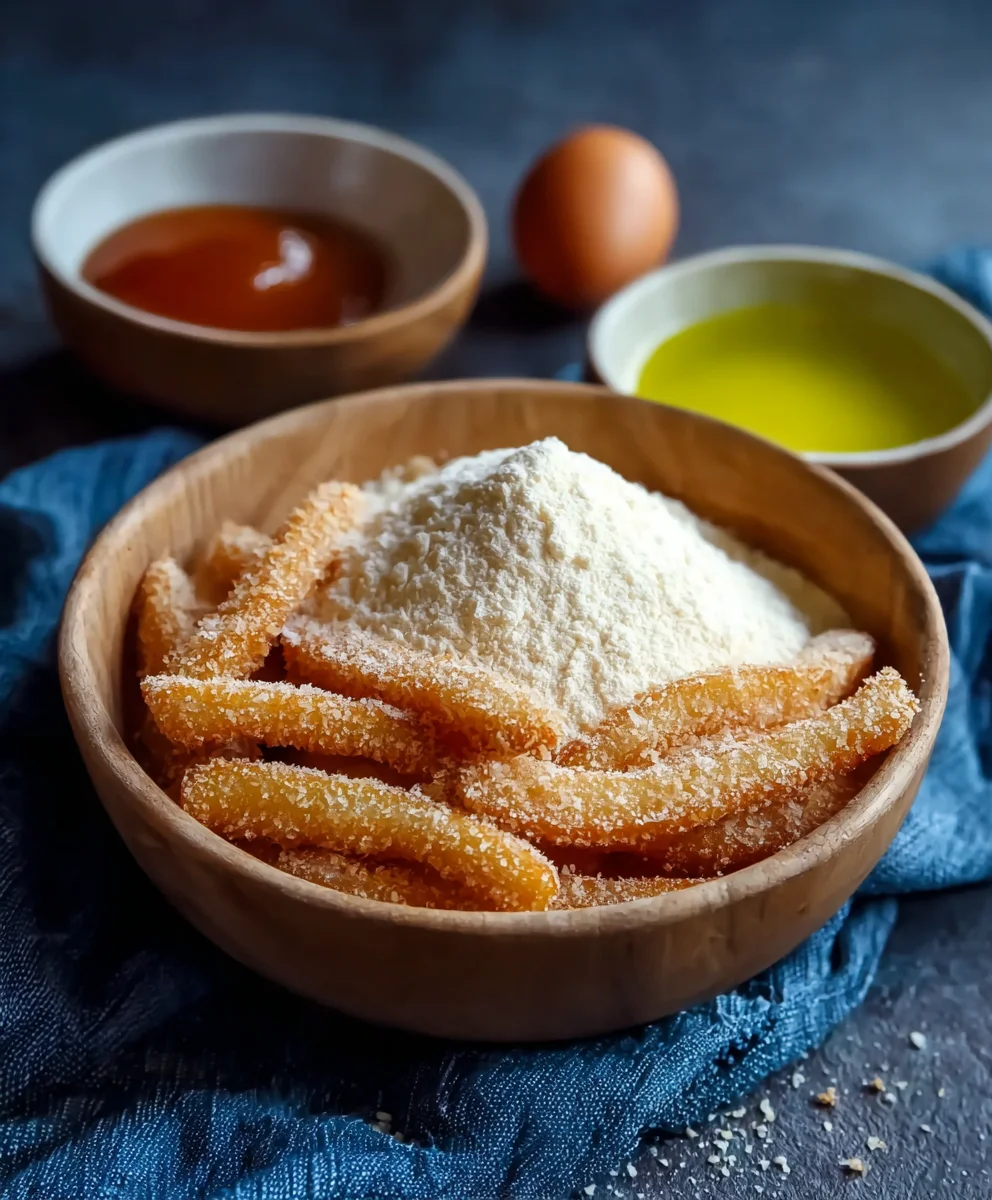
- First Bowl: The Flour: In your first shallow bowl or dish, pour the ½ cup of all-purpose flour. Make sure it’s spread out evenly across the bottom. The flour acts as the initial layer, providing a dry surface for the egg wash to adhere to. Without it, the egg might just slip right off the smooth meat.
- Second Bowl: The Egg Wash: In your second shallow bowl, crack the two large eggs. Add the 1 tablespoon of milk or water. Using a fork or a whisk, beat the eggs and milk together until well combined and slightly frothy. You want a smooth, consistent liquid that will evenly coat the pork. The milk or water helps to thin the egg slightly, making it easier to work with and ensuring a lighter coating.
- Third Bowl: The Panko Breadcrumbs: In your third and final shallow bowl, pour the 2 cups of Panko breadcrumbs. Again, spread them out evenly. Panko is key here! Its larger, flakier texture is what gives these cutlets their incredible, airy crispiness, far superior to traditional breadcrumbs. Make sure you have plenty; you might even need a little more depending on the size of your cutlets, so it’s good to have extra on hand.
- Order is Key: Arrange your bowls in a logical sequence: seasoned pork, then flour, then egg wash, then Panko, and finally, your clean plate or baking sheet for the finished, breaded cutlets. This sequence minimizes mess and ensures a proper coating technique.
The Breading Process
Now that our station is perfectly set, let’s get those cutlets beautifully breaded. This process requires a bit of technique to ensure every inch is covered and the breading stays put during frying.
- Flour First: Pick up one seasoned pork cutlet and gently dredge it in the flour. Make sure both sides are completely coated. Shake off any excess flour; you want a very thin, even layer, not a thick, clumpy one. Excess flour can lead to a gummy crust.
- Egg Wash Next: Carefully transfer the floured cutlet to the egg wash. Dip it fully, ensuring every surface is moistened. Lift the cutlet out, letting any excess egg wash drip back into the bowl. Again, a thin, even coat is what we’re after.
- Panko Power: This is where the magic happens! Transfer the egg-coated cutlet to the bowl of Panko breadcrumbs. Generously spoon Panko over the top of the cutlet, then gently press the Panko onto both sides of the meat. Don’t just roll it around; gently but firmly press the breadcrumbs into the surface of the pork. This ensures maximum adhesion and a thick, crunchy coating. Make sure every single part of the cutlet is covered. I often use one hand for the dry ingredients (flour, Panko) and the other for the wet (egg) to keep things cleaner.
- Repeat and Rest: Once breaded, carefully place the cutlet on your clean plate or baking sheet. Repeat the entire breading process for the remaining three pork cutlets. Once all are breaded, it’s highly recommended to let them rest in the refrigerator for at least 15-30 minutes. This chilling time allows the breading to really set and adhere to the pork, making it less likely to fall off during frying. This step is a small one, but it makes a huge difference in the final product’s integrity.
Frying the Cutlets
The moment of truth! Frying is where these breaded beauties turn golden brown and gloriously crispy. Temperature control is paramount here for a perfect outcome.
- Heat the Oil: In a large, heavy-bottomed skillet or Dutch oven, pour in your neutral oil. You’ll need enough oil so that the cutlets can be at least halfway submerged, ideally more. For my typical skillet, this usually means about 4-6 cups of oil. Place the pan over medium-high heat.
- Check the Oil Temperature: This is arguably the most crucial step for successful frying. You want the oil temperature to be consistently between 325°F and 350°F (160°C and 175°C). An instant-read thermometer is your best friend here.
- No Thermometer? No Problem! If you don’t have a thermometer, you can test the oil by dropping a small pinch of Panko breadcrumbs into it. If they sizzle immediately and turn golden brown within 10-15 seconds, your oil is ready. If they just sit there, it’s not hot enough. If they burn instantly, it’s too hot, and you’ll need to reduce the heat and let it cool slightly before proceeding. Oil that’s too cool will result in greasy, soggy cutlets, while oil that’s too hot will burn the breading before the pork cooks through.
- Fry in Batches: Once the oil is at the correct temperature, carefully place one or two breaded pork cutlets into the hot oil, ensuring not to overcrowd the pan. Overcrowding will drop the oil temperature too quickly, leading to soggy results. Give them space to fry properly.
- Cook to Golden Perfection: Fry the cutlets for about 3-5 minutes per side, or until they are a beautiful golden brown and cooked through. The exact time will depend on the thickness of your cutlets and the oil temperature. As they cook, you’ll see the edges firm up and the color deepen.
- Flip Carefully: Use tongs to carefully flip the cutlets to the other side and continue frying until that side is also golden brown and crispy.
- Check for Doneness: The internal temperature of the pork should reach 145°F (63°C). You can check this with your instant-read thermometer by inserting it into the thickest part of the cutlet. The meat should be juicy and tender, not dry.
- Drain and Rest: Once cooked, carefully remove the cutlets from the oil using tongs and transfer them to a wire rack set over a baking sheet lined with paper towels. The wire rack allows air to circulate around the cutlets, helping them stay crispy as they drain any excess oil. Resist the urge to stack them; they’ll steam and lose their crispness.
- Maintain Oil Temperature and Repeat: Between batches, it’s crucial to allow the oil to return to the optimal frying temperature. This might mean increasing the heat slightly for a minute or two. Skim any loose breading crumbs from the oil as you go; these can burn and impart a bitter flavor to subsequent batches. Repeat the frying process for the remaining cutlets.
Serving Suggestions and Tips for Perfection
Your beautifully fried, crispy pork cutlets are almost ready to be enjoyed! A few final touches and considerations will elevate them from great to absolutely unforgettable.
- Rest Before Slicing: While it’s tempting to dive right in, allow the fried cutlets to rest on the wire rack for 5-10 minutes. This allows the juices within the pork to redistribute, resulting in a more tender and moist cutlet. If you cut into them too soon, the juices will rush out, leaving the meat dry.
- Slicing for Serving: For easier eating and to showcase that perfect golden crust, I like to slice the cutlets into strips or bite-sized pieces before serving. A sharp knife is key here to avoid squishing the crispy breading. You can arrange these slices artfully on a plate.
- Garnish and Glee: A simple garnish of fresh chopped parsley or chives adds a lovely pop of color and a hint of freshness that brightens the rich flavors.
- Sauce It Up! These cutlets are fantastic on their own, but they truly shine with a delicious dipping sauce. Classic tonkatsu sauce (a savory, tangy, and slightly sweet Japanese sauce) is my absolute favorite pairing. Other great options include a squeeze of fresh lemon, a dollop of spicy mayo, or even a simple vinaigrette if you’re serving them over a salad.
- Perfect Pairings: Crispy pork cutlets pair wonderfully with a variety of side dishes.
- Rice: Steamed white rice or brown rice is a classic accompaniment, perfect for soaking up any sauce.
- Salad: A crisp, refreshing cabbage salad with a light dressing (often served alongside tonkatsu in Japan) provides a nice counterpoint to the richness of the fried pork.
- Vegetables: Roasted asparagus, green beans, or a simple side of kimchi can also be delightful.
- Soup: A light miso soup can round out the meal beautifully.
- Achieving Maximum Crispiness:
- Dry Pork: Ensure your pork is patted very dry before seasoning and breading. Any moisture can lead to a less crispy crust.
- Press Panko Firmly: As mentioned, really press those Panko breadcrumbs onto the cutlet.
- Oil Temperature: Maintain that ideal oil temperature! It’s the most critical factor.
- Don’t Overcrowd: Give your cutlets plenty of room in the pan.
- Drain on a Rack: Never drain directly on paper towels if you want to maintain crispness; use a wire rack.
- Making Ahead and Reheating:
- Breading Ahead: You can bread the cutlets up to a few hours in advance and store them uncovered in the refrigerator. This even helps the breading adhere better.
- Frying Ahead: While best enjoyed fresh, if you must fry them ahead, let them cool completely on a wire rack. To reheat, place them on a wire rack on a baking sheet in a preheated oven at 375°F (190°C) for about 10-15 minutes, or until heated through and crispy again. Avoid the microwave, which will make them soggy.
- Oil Disposal: Once the oil has cooled completely, you can strain it through a fine-mesh sieve or cheesecloth to remove any food particles. Store it in an airtight container in a cool, dark place for reuse (usually 1-2 more times, depending on what you fried). Do not pour used oil down the drain!
With these detailed steps and helpful hints, you’re now equipped to create truly spectacular crispy pork cutlets that will impress everyone at your table. Enjoy the process and savor every crunchy bite!
Conclusion:
Well, there you have it, my friends! We’ve journeyed through the steps of creating what I genuinely believe is one of the most satisfying and delightful dishes you could ever bring to your table. This isn’t just another recipe; it’s an experience, a moment of culinary triumph that promises to impress both seasoned foodies and pickier eaters alike. I truly believe that the unique combination of textures, from the perfectly crisp exterior to the tender, flavorful interior, creates a symphony of taste that lingers delightfully on your palate. It’s comforting yet sophisticated, approachable yet utterly special.
What makes this recipe a true must-try, in my humble opinion, is its uncanny ability to transform simple ingredients into something truly extraordinary. It’s the kind of dish that garners compliments and requests for seconds, and even thirds! The meticulous care we put into each stage, particularly in preparing the main component, is what elevates it from good to phenomenal. Think about the precision involved, for instance, in setting up the breading station – the flour in one bowl, the beaten eggs in another, and the panko breadcrumbs in a third – especially when dealing with something as specific as our main ingredient which might have been 2%20inch%20thick&text=set%20up%20the%20breading%20stationplace%20the%20flour%20in%20one%20bowl,%20the%20beaten%20eggs%20in%20another,%20and%20the%20panko%20breadcrum extractbs%20in%20a%20third%20bowl. This attention to detail isn’t just for show; it’s the secret sauce (or, in this case, the secret breading!) that guarantees that golden-brown perfection and the incredible crunch you’re craving. You’ll find that the slight sweetness combined with the savory notes, punctuated by the satisfying crunch, makes every single bite a moment to savor. It’s a dish that genuinely satisfies a wide range of cravings and always leaves you feeling nourished and pleased.
Serving Suggestions: Elevate Your Culinary Creation
Now that you’ve mastered the art of making this incredible dish, let’s talk about how to serve it to maximize its appeal. For a classic, comforting meal, I absolutely love pairing it with a simple side of fluffy mashed potatoes that can soak up any delicious juices, or a vibrant green salad tossed with a light vinaigrette to cut through the richness. If you’re aiming for something a bit more adventurous, consider serving it alongside some roasted root vegetables, like sweet potatoes and carrots, which provide a lovely sweetness and earthy balance. A squeeze of fresh lemon juice over the top just before serving can brighten up all the flavors beautifully, adding a zesty kick that truly awakens the palate. Don’t underestimate the power of a simple garnish either; a sprinkle of freshly chopped parsley or chives can add a pop of color and freshness. For a more exotic touch, a dollop of a zesty aioli or a spicy sriracha mayo on the side can add an extra layer of flavor and excitement.
Variations to Inspire Your Inner Chef:
One of the best things about a versatile recipe like this is its adaptability. Don’t be afraid to experiment and make it your own! If you’re looking to introduce a different flavor profile, consider adding a pinch of smoked paprika or a dash of cayenne pepper to your flour mixture for an extra layer of warmth or a subtle kick. For a herb-infused variation, finely chop some fresh rosemary or thyme and mix it into the breadcrumbs; the aroma and taste will be divine. Vegetarians and vegans can easily adapt this recipe by substituting the main protein with thick slices of eggplant, portobello mushrooms, or even firm tofu, ensuring they’re pressed well to remove excess moisture before breading. For a gluten-free option, simply swap out regular flour and panko for their gluten-free counterparts – the results will be just as delicious and crispy. Thinking about adding an Asian twist? A quick dip in a soy-ginger marinade before breading could be absolutely spectacular, and a side of quick-pickled cucumbers would be the perfect accompaniment. The possibilities are truly endless, and each variation offers a new adventure for your taste buds.
Your Culinary Journey Awaits!
So, what are you waiting for? This recipe is more than just instructions; it’s an invitation to create something truly memorable in your own kitchen. I genuinely encourage you to roll up your sleeves, gather your ingredients, and give this a try. I promise you won’t be disappointed. There’s an immense joy that comes from cooking a fantastic meal from scratch, and even more so when it’s something as universally loved and undeniably delicious as this dish. Once you’ve made it, I would absolutely love to hear about your experience! Did you stick to the original, or did you put your own unique spin on it? What did your family and friends think? Please, share your stories, your photos, and your triumphs in the comments or on social media. Your feedback and creativity inspire not just me, but our entire community of home cooks. Let’s make some magic in the kitchen together!
Perfect Crispy 2-Inch Panko Breaded Beef Cutlet Recipe
Achieve the perfect crispy, golden exterior on these 2-inch thick Panko-breaded beef cutlets. This recipe guides you through creating shatteringly crunchy cutlets with an incredibly juicy and tender interior, transforming a simple piece of meat into an extraordinary meal, inspired by traditions like Japanese Tonkatsu.
Ingredients
-
4 boneless beef loin chops, about 1-inch thick each
-
1 tsp salt, plus more for seasoning
-
½ tsp black pepper, freshly ground, plus more for seasoning
-
½ cup all-purpose flour (for dredging)
-
2 large eggs (for the egg wash)
-
1 tbsp milk or water (to mix with the eggs)
-
2 cups Panko breadcrumbs (the secret to ultimate crispiness!)
-
4-6 cups neutral oil for frying, such as canola, vegetable, grapeseed, or peanut oil
-
Optional: Lemon wedges, tonkatsu sauce, or your favorite dipping sauce for serving
-
Optional: Fresh parsley or chives, chopped, for garnish
Instructions
-
Step 1
Trim any excess fat from each beef chop. If thick, butterfly. Place each chop between plastic wrap and pound gently but firmly to a consistent ½ to ¾ inch thickness. Season both sides generously with salt and freshly ground black pepper. -
Step 2
Arrange three shallow bowls: one with ½ cup all-purpose flour, one with 2 large eggs beaten with 1 tbsp milk/water, and one with 2 cups Panko breadcrumbs. Arrange in sequence: seasoned beef, flour, egg wash, Panko, then a clean plate for breaded cutlets. -
Step 3
Dredge one seasoned beef cutlet in flour (shake off excess). Transfer to egg wash, ensuring full coverage, and let excess drip. Then, transfer to Panko breadcrumbs, generously spooning and gently pressing Panko onto both sides until fully coated. Place breaded cutlet on a clean plate. Repeat for remaining cutlets. Refrigerate for at least 15-30 minutes to help the breading set. -
Step 4
In a large, heavy-bottomed skillet or Dutch oven, pour 4-6 cups neutral oil (enough to half-submerge cutlets). Heat over medium-high to 325°F-350°F (160°C-175°C). Test with a pinch of Panko; it should sizzle and turn golden brown in 10-15 seconds. -
Step 5
Carefully place one or two breaded beef cutlets into the hot oil, ensuring not to overcrowd. Fry for about 3-5 minutes per side, or until golden brown and cooked through (internal temperature 145°F/63°C). Use tongs to flip carefully. -
Step 6
Remove cooked cutlets and transfer to a wire rack set over a baking sheet lined with paper towels to drain excess oil and maintain crispness. Between batches, allow the oil to return to optimal frying temperature and skim any loose breading crumbs. Repeat for remaining cutlets. -
Step 7
Allow fried cutlets to rest on the wire rack for 5-10 minutes. Slice into strips for easier eating. Garnish with fresh chopped parsley or chives (optional) and serve immediately with lemon wedges, tonkatsu sauce, or your favorite dipping sauce.
Important Information
Nutrition Facts (Per Serving)
It is important to consider this information as approximate and not to use it as definitive health advice.
Allergy Information
Please check ingredients for potential allergens and consult a health professional if in doubt.


Leave a Comment